
When it comes to cycling, we always think of safety first. We have our helmets and our bike reflector vest, but somehow, my hubby always forgets the vest but remembers the helmet. That really doesn't make sense! So, when my umbrella broke I decided to make a bike bag with reflectors on it. The bag would be a permanent fixture on the bike. Then I thought why not sew in some blinky LED lights.

I got really excited but after a while, I lost interest in the project. The umbrella sat in my store room for a while until last week when one of the co-founders, Veera, from Sustainable Living Lab suggested I venture into wearable technology. My reactions were "I don't know programming code!" and "I failed physics!", but then I just decided to dive straight into it. What's more, I had the umbrella to bike bag to work on, right?
LilyPad Arduino
So, we got the LilyPad Arduino protosnap development board, and I got cracking. Okay, sewists, this is a sewable piece of technology which allows electricity to run through textiles, and with a bit of programming (C/C+ to be exact), you can get your garment to detect the environment and translate it into a response. Cool, right? If you don't know programming, that's okay too because the code is open-source - so, this makes it great for non-tech people like me. And, wait, did you know that it is WASHABLE? (Oh, remember to take out the battery first).
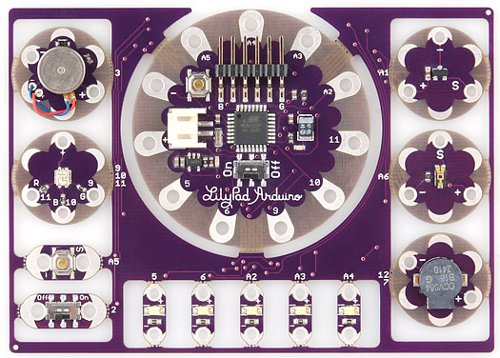 |
| Courtesy of Sparkfun From top left, buzzer, LilyPad Arduino board, temperature sensor, light sensor, sound, LED lights (A4, A3, A2, 6, 5), ON/OFF switch, touch sensor, RGB light. |
Sew Different
When you sew the LilyPad, you need to use 2-ply conductive thread - it has a metallic component but soft enough for you to sew by hand. All other parts of the bag require non-conductive thread.
The Planning
I wanted my bike bag LED lights to turn on when it was dark, and switch off when I entered bright spots. Because I was going to sew an electric circuit, I didn't want the conductive thread to show up on the outside of the bag. So, my bag was going to have a lining. I also planned for an internal pocket to cover up all the electronics, save for the light sensor and LED lights which would be facing outwards.
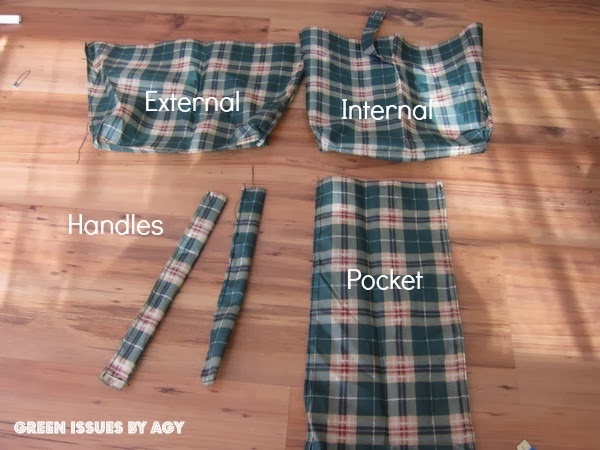
From my umbrella fabric, I cut out:
a) 4 pieces for the main body (2 external, 2 internal lining)
b) 2 pieces for the handles
c) 1 piece for the internal pocket
Drawing the Circuit
This step is important as you need to plan where your conductive thread is going to go. Remember, all sensors (e.g. light sensor) and output devices (e.g. LED light) must be connected up to the main LilyPad via the negative and positive points. LilyPad Arduino site does a good job explaining it.

I Sewed the Bag First
You can have a look at my jean bag tutorial to get an idea of how to do a bag with lining. If you are using umbrella fabric, please remember to do a test run on a scrap piece of umbrella fabric. I had to change my needle and adjust the top thread tension to "7" (first time it's been so high!) to get the straight stitch looking good.
 |
| I took cut the fabric so that I could still use the umbrella strap. The intent was to use it as a key fastener. |
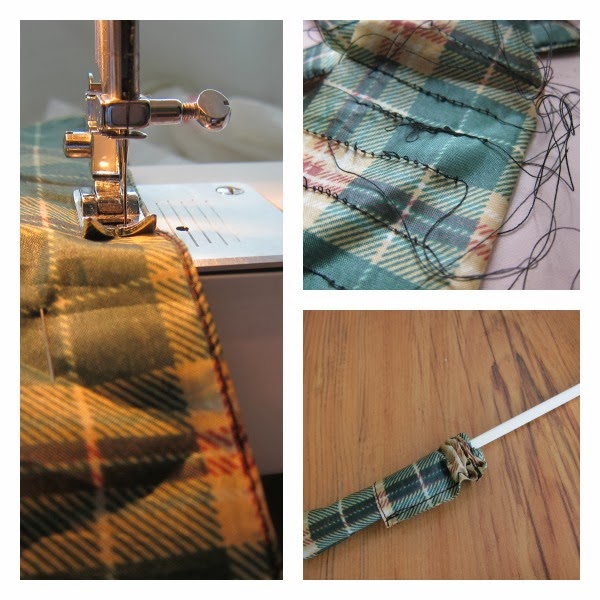 |
| Tip: Use a chopstick to turn your handles inside out after sewing! |
Programme and Test it Out
This is easy if you have the same board we got, but if you just bought the individual pieces that's okay too as you can use crocodile clips to connect the pieces. Sparkfun has a great tutorial on how to programme your board. I won't go into it here.
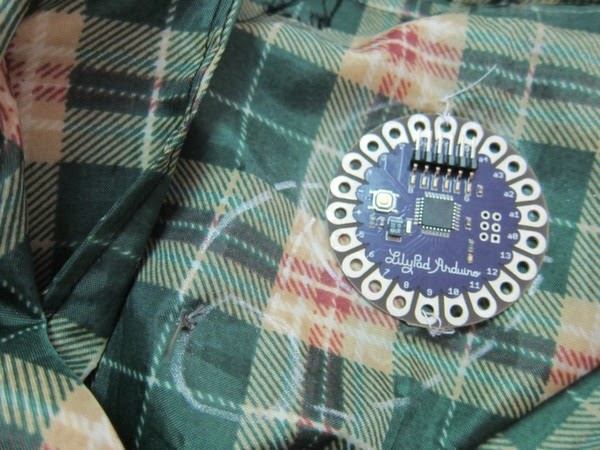
Sew on Your Circuit
Using tailor chalk, I marked the positions of where I wanted the electronics to be. I then used non-conductible thread to sew down the LilyPad first before using the conductive thread for the circuit. I used a running stitch.

You will see that I have a roll of fabric with an "X". That's my bridge - unfortunately, I had to cross my (-) and (+) threads. Doing so would short the whole circuit, but the bridge stops them from touching each other. This indicates I didn't follow my plan to the T!
 |
| Off ..... On! |
Stand Back and Admire
Woo hoo! Hubby was very impressed, although he did ask whether someone would steal it. It is for this reason, I made the handles with snap fasteners. I can remove it after cycling and use it as a handbag!

I hope I haven't confused anyone here, but the possibilities of using the LilyPad to upcycle your clothes is endless - temperature sensor blanket for kids, or just a blinky dress for the night out! These projects will just need a lot more planning, and a little bit of programming!


This tutorial was featured on


so amazingly cool! and I love that you got to a project that you'd set aside for a time...this was the perfect time to pull it out (so it all worked out, right?) :) so innovative and love the possibilities here. Thanks for sharing this!!!
ReplyDeleteThank you, Andrea. Yes, I'm glad it worked out but I still have a large piece of the umbrella fabric left. Trying to find some other project to use it..
DeleteWOW!!! Combining programming, electronics and sewing to make a safety item for the bike that is also totally practical. Very impressive, Agy!!!
ReplyDeleteThanks, Pam!
DeleteOMG!!! You are now officially a techy geeky greenie who sews!!! Absolutely cool!!!
ReplyDeleteThanks, Nueyer! Someone did say on Friday that I am a cool chick. Haven't heard that in eons! Ha ha haha.
DeleteOH my goodness Agy! What a cool project! Flashy lights in my sewing - this I have to explore! :)
ReplyDeleteYes, do explore it, Jill. It's fun :-)
DeleteInteresting!! I like it very much.
ReplyDeleteThank you!
Deleteπολυ ωραια ιδεα μπραβο!!!!
ReplyDeleteΑΝΑΣΤΑΣΙΑ
This is AWESOME!!!!
ReplyDeleteHey!
ReplyDeleteAny chances you could share the code you used?
Thanks :)
Hi! I would love to try making them out. Btw can I know where I could get the Lilypad Arduino Protosnap development board at? :)
ReplyDeleteThat is awesome! I love the concept & look of it.
ReplyDelete